
Method

Figure 1: Crossed billboards before grass texture application creating a star formation.
Texture application was the next step in creating a single grass tuft, however, simply adding the texture-image doesn't allow for transparency between grass blades. Alpha testing in the fragment shader was used to remove unwanted pixels from the texture (i.e. those with a zero alpha value) as a preliminary solution. Unfortunately, this technique left small semi-transparent pixels near the edge of the grass blades (assumedly from OpenGL interpolating the color value as it dramatically changed from 100 percent to zero percent opacity). This gave the billboard a white border that was especially pronounced in clusters and made the star or plane design much more apparent. To combat this issue, additional alpha blending was used with the depth mask disabled before drawing the grass, fading the border into with the background. Fig. 2 presents the final results of the process below.

Figure 2: Alpha tested texture added to billboards.
After making a single grass patch, basic instancing was added straight away, rather than running a loop with many draw calls. Instancing works great for grass, as the same object is being copied thousands of times with minimal alteration and requires only one call with the translations, etc. computed separately and passed into the vertex shader. To begin an array of positional offsets vectors was used to modify the grass' position. The method of binding a single vector in very simple and the offset can just be added to the position in the vertex shader, making it a good a starting point to ease into instancing. Matrices require multiplication and proper ordering to get the desired effect, i.e. other transforms such as scaling, shearing and rotation, which were not yet needed. Fig. 3 shows a simple grass grid generated using this technique.

Figure 3: Instanced grid of grass.
Following the grass grid, basic planar ground with a texture was added to give the grass some context. To do this much of the code creating a billboard, such as creating a quad and adding a texture, was recycled, but new basic shaders were introduced (so the ground wouldn't be instanced). Also, the texture was set to repeat rather than clamp-to-edge so that it continued regardless of the defined plane size. Fig. 4 displays the new image.
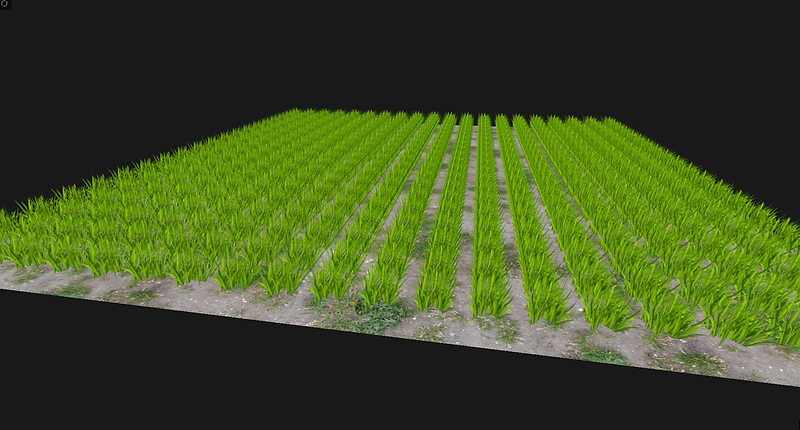
Figure 4: Grass grid with added plane of ground for context.
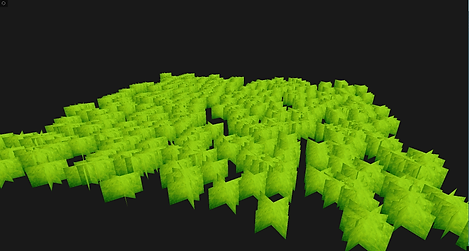
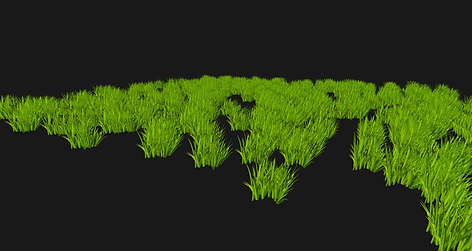

Figure 5: Positions randomized.
Figure 7: Matrix scaling, rotation and translation.
After creating a basic field, the next step was to add some animation. To experiment with this, a sine function was first used to modify the x and z-coordinates of the grass based on the current time, moving them across the ground. The time value was given to the vertex shader and added as a positional offset here so as not to disrupt the matrix transformations. A short video of this is shown below.
To simulate grass waving in the wind a shear transformation was applied to the grass in the vertex shader. The uniform time-variable was once again used to make a shear matrix controlled by the sine of the time. Multiplying the shear matrix after the instance matrix of the position caused all of the grass tufts to wave in the direction they had been randomly rotated (see here: https://youtu.be/z83-Cta-UsA). To make them all wave in the same direction the shear matrix was multiplied before the instance matrix (and after the view matrix), so that the rotation transformation would affect the direction of the shearing. The below video demonstrates the new effect.
The current wind effect is better than the previous random one, however having all the grass pieces sway in unison is not very convincing, and causes seasick or boat-rocking feeling. To stop this, the 'wind' was delayed across the x-coordinate or distance of the grass so that it looked like a wave was rippling through it. This is far more accurate to how wind appears in real life and makes the scene more organic. Later manipulation across the z-coordinate was added to increase variation. Other methods such as the sum of sines approximation suggested this GPU Gems water simulation idea could possibly be adapted as an alternative method of creating waves on grass, however time limitations narrowed the scope of the animation. The video below shows the results of a rolling wave.
Media:
Next, Phong lighting from a point light source and a skybox were implemented. The lighting was computed using normals directed towards the positive y-axis (as suggested by Pelzer in GPU Gems) and added to the vertices and texture coordinates array. The lighting was added by passing the current camera position, light position and color to the vertex shader, which then passed the information to the fragment shader, where the ambient, diffuse and specular components were computed. Directional light was later used as it more accurately simulates light from the sun, but for simplicity point light Phong shading was used first since it had already been covered in class. The skybox was loaded in as a cubemap and applied to the edges of the world via the help of this tutorial: http://learnopengl.com/#!Advanced-OpenGL/Cubemaps. See the video below for latest effects.
There are many challenging elements when it comes to rendering large quantities of an object. Detailed modeling of each blade is difficult to do in real time as the memory requirements and time needed for large areas would be far too much. To overcome this issue, I followed Kurt Pelzer's chapter in NVidia's first GPU Gems titled Rendering Countless Blades of Waving Grass (2004), in which he details an intersecting billboard technique. By crossing multiple grass billboards in a star-like formation (Fig. 1), you can easily create volume with minimal drawing and allow for a convincing visual effect from any line of sight.
Grass covers large quantities of the planet and is vital to any natural scene, yet its small size and high abundance makes it difficult to recreate. Storing each blade in memory for a large meadow can be costly and inefficient. The aim of this project was to procedurally generate and naturally render grass in real time, without much impact on performance. In order to do so, large quantities of dense, irregular grass had to be generated and rendered on the screen quickly and with sufficient detail. This was done through the use of grass billboard 'stars' instead of individual blades, and instancing to produce large quantities of the same object. Animation of forces (i.e. wind) and lighting (i.e. Phong shading and shadow mapping) were implemented as well to add to the naturalness of the scene.
Figure 6: Random positions with grass texture.
Figure 8: Matrix transforms with added grass texture.
Pelzer, Kurt. "Chapter 7. Rendering Countless Blades of Waving Grass."NVIDIA Developer Zone. NVIDIA Corporation, 2004. Web. 20 July 2016. <http://http.developer.nvidia.com/GPUGems/gpugems_ch07.html>.
Whatley, David. "Chapter 1. Toward Photorealism in Virtual Botany." NVIDIA Developer Zone. NVIDIA Corporation, 2005. Web. 20 July 2016. <http://http.developer.nvidia.com/GPUGems2/gpugems2_chapter01.html>.
Bunnell, Michael, and Fabio Pellacini. "Chapter 11. Shadow Map Antialiasing."NVIDIA Developer Zone. NVIDIA Corporation, 2004. Web. 20 July 2016. <http://http.developer.nvidia.com/GPUGems/gpugems_ch11.html>.
De Vries, Joey. Learn OpenGL. N.p., n.d. Web. 1 Aug. 2016. <http://learnopengl.com/>.
"Tutorial 16 : Shadow Mapping." Opengl-tutorial. N.p., n.d. Web. 1 Aug. 2016. <http://www.opengl-tutorial.org/intermediate-tutorials/tutorial-16-shadow-mapping/>.
Sources:
Green Paint. Digital image. Bgfons.com. N.p., n.d. Web. 22 July 2016. <http://bgfons.com/download/2140>.
Boughen, Max. Green Grass Long. Digital image. MaxTextures.com. MB3D, 2012. Web. 22 July 2016. <http://www.mb3d.co.uk/mb3d/Grass_and_Snow_Ground_Seamless_and_Tileable_High_Res_Textures.html>.
Reiner. Billboard Grass. Digital image. Reiner's Tilesets. N.p., 17 Aug. 2013. Web. 22 July 2016. <http://www.reinerstilesets.de/new-textures-billboard-grass/>.
Irrgang, Heiko. Free Skybox Texture Set. Digital image. 93 Interactive. Nikola, n.d. Web. 22 July 2016. <https://93i.de/p/free-skybox-texture-set/>.
Aspen Tree in Strong Wind. Juskiddink, 2009. Freesound. Web. 2 Aug. 2016. <https://freesound.org/people/juskiddink/sounds/78955/>.
Textures:
Inspirations:
http://http.developer.nvidia.com/GPUGems/gpugems_ch07.html
http://www.kevinboulanger.net/grass.html
Modding The Elder Scrolls: Skyrim with various highly realistic grasses and vegetation
Playlist of grass videos:
https://youtu.be/auWXMaCXsc4?list=PLbCCTxDYG7TA45nyIgtKwosgFFXQ99m8z
Images can be found here or the menu option at the top of the page.
Next, positional randomization was added to the current vector translations to move towards a more realistic scene, yet the lack of variation in height and constant orientation of the billboards caused the grass to still look very obviously generated. As a consequence of this, the positional offset instancing was changed to use a transformation matrix that allowed for scaling, rotation and translation of the grass. This proved somewhat difficult at first due to OpenGL not accepting a 4x4 matrix as a vertex attribute array, necessitating the matrices to be added as four separate vertex attribute arrays. This vector simulation of a matrix was the product of checking this instancing tutorial on learnopengl.com. Figures 5 and 6 show positional randomization using vector offsets. Figures 7 and 8 show the process of increasing randomization through the scaling and rotation transforms offered by matrix instancing. Finally, OpenGL offers multisampling through an enable-feature (not done with custom frame buffer) , so it was added to create smoother images.

Figure 9: Directional lighting, texture atlas and color alterations with a new skybox.

Figure 10: Depth texture visualized before application to the grass.
With all the desired features implemented and the simulation running at roughly 2000 FPS with 400 grass tufts (as seen above), the next step was to upscale the number of particles being rendered. In order to generate tens of thousands of grass billboards, the run-time stack size needed to be increased past one megabyte to accommodate for the large number of instance matrices being generated. This is a minor cost compared to the time it would take to draw thousands of individual objects. After increasing the amount of grass, shadow mapping the entire area would be too computationally heavy and unnecessary as shadows are hard to see at a distance. To fix this issue, the projection frustum for the light and depth space calculations was bound to the camera coordinates so that moving the camera moved the current area in shadow. To demonstrate this, the video below shows a completely dark shadowed area following the camera as it moves around.
This next video applies the shadow mapped area to a large field showing how even a small orthographic frustum can make it hard to tell that the shadows are not only being dynamically calculated but also moved.
One of the key reasons for simulating the grass with a billboard technique was to boost performance. Games such as The Elder Scrolls IV: Oblivion, released in 2006, used this technique due to the computing and memory limitations of gaming consoles and computers at the time. To showcase the power of this method in generating large quantities of grass on an average system today, the simulation was stress tested with 90,000 grass instances (each with three billboards, animation and lighting). Through using an outfile and simple frames per second (FPS) calculations the average FPS during the run was 145.4! (this is even greater than the refresh rate of high end monitors at 144 Hz!). The video below shows a snippet of the stress test running Unfortunately all videos for this project are recorded at 30 FPS so the quality may seem somewhat lower.
To close, some videos and images were taken under different light colors and with various skyboxes to show how the grass looks under different conditions. Additionally, sound was added via the irrKlang library for further ambiance.
The goal of this project was to naturally render grass in real time with minimal impact on performance. Through using Pelzer's billboard star method to minimize the number of polygons (i.e. triangles) being drawn and procedural generation via instancing to reduce the number of draw calls, the overall performance stayed high. Animation effects were added by multiplying the resulting grass objects by different matrices and diversity of grass color and texture type through rgb manipulation and a texture atlas. A skybox and basic planar ground are used give the scene some context, rounding out the realism of the simulation. Finally, shadows and lighting were added through a depth map, Phong shading and various shadow fixes. Higher quality textures, better noise functions and animation could improve accuracy, however, the overall project was a success in providing a visually convincing scene with very strong performance.

Libraries:
http://www.lonesock.net/soil.html
http://glm.g-truc.net/0.9.7/index.html
http://www.ambiera.com/irrklang/downloads.html
Following the point light, directional lighting, a texture atlas and color variation was added to the scene. The point light was changed into a directional light by altering the light direction vector computation in the fragment shader. Rather than finding the vector between the fragment and the light positions, a pre-defined or uniform direction vector was used and negated (so away from fragment) before normalization.
Making the texture atlas was the next step in introducing a more diverse collection of grass types to the screen. A larger image (four times the length of the base texture) was used with two grass and two flower textures each taking up one grid spot. The four textures were spaced out to minimize blurring caused by interpolation between the textures in mipmapping. Choosing with texture was done through another random function for each instance, allowing for the vertex shader to appropriately modify the texture coordinates so that the correct image was used for that instance (video of atlas-grass with directional light: https://youtu.be/c5ClwolSDAI).
Finally, some variation was added to the RGB values of the texture in the fragment shader so that all the grass wasn't the same green color. This was an easy and highly necessary addition in increasing the overall aesthetics of the grass. Fig. 9 below shows the newly added features.
The final extension, and perhaps the most difficult one to implement, was shadow mapping. Shadow mapping works great for outside scenes, unlike deferred rendering, as it allows for soft shadows (at the cost of aliasing). Another benefit of directional shadow mapping is that it is much faster than point light shadows, as point lights extend outwards in all direction from a source, requiring a cubemap depth texture to be made, which means rendering the scene from six different perspectives. To start, a depth texture was made with a frame buffer and the scene was rendered using shaders that transformed the positions to the depth or light space. The depth space matrix was substituted for the projection and view matrices in the shaders and multiplied by the instance matrix to get the new position. To compute the depth space matrix, an orthographic projection matrix was made with the bounding frustum set to the edges of the grass, and a new view matrix was made with the lookat function (from inverse light direction to origin). The method of finding and computing these matrices was adapted from a shadow mapping tutorial that can be found here.
Usually only the fragment depth is written in the fragment shader, however, the texture still needed to be used to eliminate writing the transparent parts of the quad or billboard to the depth texture. Fig. 10 shows the depth texture applied to the ground plane. Note that the image is quite aliased due to the depth map resolution being low (1k).
To render the shadows onto the grass an additional shadow calculation was added to the light shading (proposed in learnopengl.com's tutorial here along with fixes), by multiplying the result with the diffuse and specular components of the light. Ambient light was left out since shadows rarely cause complete darkness outside. In the calculation, the fragment position in the depth space (found with matrix used above) was converted to the range [0, 1] so that it coincided with a position in the depth map. The depth coordinate is then the z-coordinate of the depth space fragment, as the -z-axis aligns with the direction of the light in the depth space. This was then compared to the closest depth value at that position to check if the object was in shadow or not, returning zero or one. This method worked well to get the shadows onto the grass, however it can leave problems such as: shadow acne, Peter Panning and aliasing.
Shadow acne was not a real issue, as the grass tufts are made of planes and not objects with any volume. However, as a preventative measure, a small bias was applied (i.e. removed) to the fragment's depth value so that the light never went too far.
An artifact of the bias offset, Peter Panning made some the shadows be projected at the wrong location. This problem is quite difficult to see with large quantities of closely placed grass, but is still evident when viewing up close. The front and back faces of a plane in OpenGL are actually separated by a very small distance, so simply switching the culling to front face instead of back face during depth texture generation allows the depth map to get the correct values and fix the issue.
Aliasing is a common problem with shadow maps, as the depth map doesn't have a high enough resolution to provide each fragment with a different sample location. A solution to the 'jaggies' problem comes from a technique called percentage-closer-filtering of PCF for short. The general idea is to loop over the surrounding area of the texture and sample at slightly different coordinates, averaging the result. This grid multi-sampling process is the similar to how images are anti-aliased in a ray tracer. Due to not having a random function in the fragment shader, the samples were not jittered so Moiré patterns may emerge. Stratified sampling is a possible fix to some of the shadows, yet wasn't implemented due to constraints on writing a random (noise) function. This method is modelled after Michael Bunnell and Fabio Pellacini's section: Shadow Map Antialiasing of GPU Gems.
A final issue found with shadow mapping is that objects outside of the depth map's range appear to be in shadow. To stop this a 'border' was applied to the depth map so that any value outside of its range receives no shadows (i.e. normal lighting) so that a shadow-box effect is not strongly seen. The video below shows the final shadow map applied to a small patch of grass.